- Click at Developer → Record Macro. Alternatively, you can click at Record Macro button. It is located in status bar (bottom, left side)
- A pop out called Record Macro will appear. Give a name to your Macro: MyMacro. Store macro in: This Workbook, then click OK
- Then go to excel, in cell C1, please type "A". Type "B" in cell C2, "C" in cell C3, and so on until cell C10
- In cell D1, type "A" and type "B" in cell D2. Select both cell D1 and D2, then click autofill
- Stop recording by clicking at Developer → Stop Recording. Alternatively, click at square button located in status bar (bottom, left side)
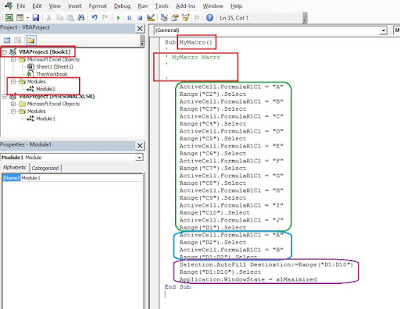
- To view Macro, go to Developer tab → Macros → Edit. Alternatively, right click at worksheet, select View Code
- Excel has recorded your Macro and will display in VBA Editor. It is located in VBAProject (workbookname) → Modules → Module1
- To run your Macro, firstly, clear column C and D in excel. Then go to Developer tab → Macros → select Macro name: MyMacro → Run
- Go to excel window and you will see the results
- Congratulations! You have successfully recorded and run your first Macro!
Stop searching. Start learning and developing your excel skills.
Record Macro
August 05, 2017 |
Labels:
First Step
Other Excel Tutorials:
Subscribe to:
Post Comments (Atom)


No comments:
Post a Comment